Yoga Poses For PCOS: Steps, Benefits And Tips
Discover effective yoga poses for PCOS in this informative blog. Also learn steps, benefits, and useful tips to enhance your practice.
Yoga holds immense significance in India. It is not only a physical and spiritual practice, but also a representation of the country’s rich cultural heritage. Originating in ancient India, yoga has been passed down through generations as a means of achieving unity and harmony between the body, mind, and soul. It demonstrates the true meaning of finding oneself through self-awareness and self-realization, which helps individuals connect with themselves on a deeper, spiritual level.
Moreover, apart from bringing a greater sense of being to Indian people, yoga has now spread its branches internationally as well. That’s why the UN assembly unanimously chose June 21st as the “International Yoga Day” to further commemorate the divine art of yoga!
As many of you may be aware that practicing yoga has numerous benefits to body and soul; but what if we were to tell you that it can help in alleviating symptoms of disorders like PCOS. Yes, there are certain yoga poses for PCOS that can help women manage PCOS symptoms. In this blog, we’ll be discussing some yoga poses for PCOS, their benefits and also some precautionary tips.
So, let’s get started without further ado. However, before we delve into the aforementioned yoga poses, let’s understand more about the condition: PCOS
What Is PCOS?
PCOS stands for polycystic ovarian syndrome, and it’s a disorder affecting ovaries in women leading to development of cystic follicles. This syndrome can causes anovulation (when an egg fails to release from the ovary during the menstrual cycle) and disrupted period cycles. Moreover, it also causes symptoms such as :
- Skin problems like oily or acne-prone skin
- Excess hair growth on chest, thighs, stomach, and/or face
- Infertility
- Scalp hair loss
- Unusual weight gain
PCOS also gives rise to psychological disorders such as anxiety, depression, and sleep disorders (like sleep apnea). Other, major disorders associated with PCOS include cardiovascular diseases, diabetes, high cholesterol levels, glucose intolerance, metabolic disorders and infertility.
According to a study, 1 in every 10, i.e., approximately 4–20% women of reproductive age suffer with polycystic ovarian syndrome.
Now that we have a good understanding of the symptoms of PCOS, let us explore some effective yoga poses for women with PCOS/ are at risk of developing PCOS.
Effective Yoga Asanas For PCOS
Yoga poses for PCOS are inclusive of a wide range of asanas. However, in the following section, we’ve mentioned some effective yoga poses that may specifically help with PCOS.
1. Kapalbhati Pranayam

This yoga asana can be easily performed by anyone and is a crucial component in body cleansing. The word “Kapalbhati” is derived from two words: “Kapal,” meaning skull, and “Bhati,” meaning illuminating.
Let’s take a look at how you can perform Kapalbhati :
- Make sure to sit upright with your spine erect and place your hands with palms facing towards the sky on your knees.
- Inhale deeply.
- As you begin to exhale, make sure that your navel is being pulled towards your spine and you’re able to feel the abdominal muscles contract. Do this as much as you comfortably can.
- Take 20 such breaths to complete 1 round of Kapalbhati.
- After each round, make sure to close your eyes, relax and feel the sensations in your body.
- It’s recommended that you perform a total of 3 rounds of Kapalbhati.
Benefits Of Kapalbhati
- Increases the metabolic function of body
- Improves lung health
- Boosts digestion
- Helps with better blood circulation
- Relieves oxidative stress (low anti-oxygen value of cells)
2. Baddha Konasana Or Butterfly Pose

“Baddha Konasana” is derived from “Baddha” meaning bounded, “Kona” angle, and “Asana” meaning pose. This yoga pose is also known as “Butterfly Pose.”
Steps to perform butterfly pose :
- Sit upright on the ground with your legs stretched out while your hands are kept on the side.
- Keep your neck and spine straight when you maintain this position.
- Begin inhaling, while bringing in both of your legs towards your body.
- Once you’ve brought your legs towards your body while they’re still in contact with the ground, with your feet facing each other (as shown in the image above).
- Try to be in the same position for at least 6 seconds and exhale.
- Slowly stretch your legs back to the starting position as you exhale over a count of 3.
Benefits Of Baddha Konasana
- Increases mobility of hip and groin muscles
- Helps with digestion and bowel movements
- Eliminates fatigue from walking or standing for long periods
- Improves posture and concentration
- Relief from menstrual discomfort
3. Chakki Chalanasana
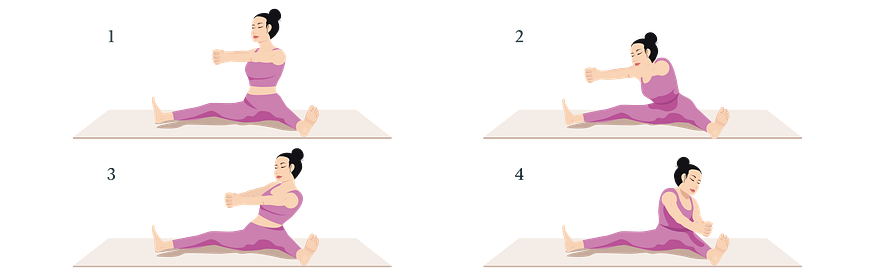
This yoga pose is called “Chakki Chalanasana” because it mimics the very action of using a manual stone flour mill.
To perform this yoga asana for PCOS, all you need to do is follow the instructions below :
- To get in the starting pose, sit with your legs spread wide apart. Bring your hands together in a clasp and extend your arms forward at shoulder height.
- Once you get in this posture, inhale deeply and move your upper body forward and to the right. Then try to move your whole body in a clockwise motion.
- While you go to the right and move your upper body forward, breathe in and breathe out as you move your upper body backward and to the left.
- Continue to take deep breaths while performing this yoga asana, and make sure to do at least 5–10 rounds in each direction.
Benefits Of Chakki Chalanasana
- Helps in preventing sciatica (the pain that occurs in the sciatic nerve which passes through lower back to hips)
- Helps in toning of arms, back and abs muscles
- Help in preventing periods-related pain
- Regular practice may even help in reducing abdominal fat
4. Shavasana

Shavasana is derived from the Sanskrit word for dead body, which is “Shava.” This pose simply gets its name from the lying position of a human body during its final moments. Shavasana is typically done at the end of a yoga session as it provides the utmost rest and relaxation to the muscles.
Steps to perform Shavasana :
- To begin, lie flat on your back, preferably without any cushions. If necessary, you can use a small pillow beneath your neck. Close your eyes for added relaxation.
- Keep your legs comfortably apart, allowing your feet and knees to completely relax, with your toes facing the sides.
- Position your arms alongside your body, slightly spread apart. Keep your palms open and facing upward.
- While you’re performing Shavasana, we recommend you to get into a state of meditation if you can and let go of every worry and thought you may have. But just make sure that you don’t fall asleep!
Benefits Of Shavasana
- Helps in relieving stress
- Helps in reducing anxiety and insomnia
5. Padhma Sadhna

Padma sadhana or padmasana is a form of deep meditation. The word padmasana is derived from the the Sanskrit word for lotus, which is “Padma.”
Steps to perform padmasana :
- Start by gently bending your right leg at the knee joint and folding it inward.
- Now, with the assistance of your hands, place the right heel on the top of the left thigh, ensuring that the sole of the right foot is facing upward.
- In a similar fashion, position your left heel with the soles turned upward on the right thigh, allowing the ankles to cross each other. Ideally, the heels should be placed close together.
- Press both knees down towards the ground as much your body allows you to, but while continuing to maintain contact with the floor.
- Ensure that your body is comfortably erect, aligning your head, neck, and trunk in a straight line.
- Now, based on your personal preference, you have two options. You can either fold your hands in a “namaste” position or place them on top of one another just below your navel, securely resting on your lap with palms facing upward.
- Sit in your preferred position and meditate while focusing on your breath, moreover also switch your legs in-between.
Benefits Of Padmasana
- Helps with sciatic pain
- Alleviates period pain
6. Setu Bandhasana

The name for this yoga pose originates from Sanskrit. “Setu” means bridge, while “Bandha” and “Asana” mean lock and pose, respectively. As this yoga pose resembles a bridge, it’s also commonly known as Bridge pose.
Follow the below-mentioned steps to perform Setu bandhasana :
- First lie on your back, then, fold your knees whilst keeping your feet flat on the ground.
- Align your knees with your ankles, and position your feet close to your buttocks to maintain proper alignment. Throughout the entire pose, make sure to keep your feet parallel to avoid compression in the lower back.
- Place your arms parallel to your body on the floor, with your palms facing down.
- Inhale and slowly lift your body off the floor, pushing your pelvis, lower back, and sternum upward while pressing your feet into the floor.
- Roll your shoulders gently and aim to bring your chest toward your chin without lowering the chin, while supporting your weight with your shoulders, arms, and feet.
- You should feel your buttocks firming up in this pose, with both your thighs and feet parallel to each other.
- Take slow inhales and exhales while trying to hold the yoga pose for 10–15 seconds.
- Release the Setu Bandhasana yoga pose by bringing your back and buttocks down.
- Lie down in your starting position again, relax for a few seconds, and repeat the yoga pose to practice it further.
Benefits Of Setu Bandhasana
- Helps in stretching the entire body
- Helps with digestion
- Helps in relieving stress
- Improves digestion
- Tones abs and buttock muscles
If you’re new to yoga, here are some tips which you must consider for a safer and easier experience.
Yoga Tips For Beginners!
- Choose a convenient time and a comfortable place
- Practice yoga poses with an empty or light stomach
- Wear comfortable attire while performing yoga
- Do a light warm-up or stretching before trying intense yoga poses
- Know what your body says and don’t push yourself much
- Don’t expect to get the results on the very first day and be consistent
- Don’t forget to have fun!
Final Note!
Now that we have learnt 6 yoga poses for PCOS, are you ready to try them all? You may also give these poses a shot even if you don’t have PCOS as they can be beneficial for individuals at risk of developing PCOS, and for your general well-being too!
Disclaimer*: If you’re someone with a past of a spinal or head injury, we recommend you to consult your doctor before attempting any of the mentioned yoga poses.*
Article Source :
This article was originally published on
https://www.lifecell.in/blog/general/yoga-poses-for-pcos-know-steps-benefits-and-tips
What's Your Reaction?


.jpg)

